Sunday, March 20, 2016

Courage Under Fire!!! The story of one prom dress that almost was not - McCall's 6288 Mod

My daughter is very different from me and in her junior year she got invited to FOUR proms and I went to none. Thankfully, she does have a little job and can pay for some of her stuff. So we went shopping for prom dresses and were completely underwhelmed by the in-store offerings and the dresses that she wanted did not fit - we all have body issues. You probably know what I am talking about - lotsa lotsa rhinestones and sparkles, however, that is probably the point. In one of the stores we saw a very basic top and a poufy skirt which had a hefty price tag that was not justified. I blurted out - "I could easily make something like that" - big mistake! Daughter latched on to that - and asked me - can you really make me a dress? All of a sudden, I felt a bout of sewing confidence boosted by frugal self-righteousness - "but, of course", all the while averting my eyes...
That was 3 weeks prior to the prom. The reality is I have never ever made  finished an evening dress let alone a formal gown! First week, I was googling prom dresses, the reality and the urgency of the due date looming in a "distant" future - I had time, I got this! Daughter drew this sketch for me. She wanted an almost neoclassical dress with open shoulders and gathered skirt.

Despite having close to a thousand of patterns (including my years of Burda subscription), I could not find any that could be adapted to create what she wanted. I decided to act like Steve Jobs and shove my vision (of available patterns) to her. Alas, I was met with unexpected resistance and all my pinned suggestions were rejected. So I decided to wing it and go with the flow - to implement daughter's design. I went to the Hi-Fashion Fabrics store and got some samples. I came back and caught her before she left for work and she made her choice. I went back and got 6 yards of the sparkly blue knit and 8 yards of stretch mesh to create the "fluffy" overlay skirt. I was all gung-ho and ready to roll - then the reality of not having a pattern hit hard...
I imagined the seam all crooked and uneven due to two layers of gathers where the skirt is joined to bodice. But, wait, I thought, I had a solution - I will add a pretty ribbon and cover it. I ran over to Joann's and perused a tiny selection of acceptable ribbons. Before buying, I ran my tiny design mod by daughter and once again - a resounding No - Ribbon is a No Go. My resolve deflated anticipating a sewing disaster and I kind of stopped with all activities. Then, we had an argument, probably about her driving or lack of the ability to, and she told me not to bother sewing the dress - Twitter showed that she had no trust in me. That relieved me of my contract to sew the prom dress - I decided to save the fabric either for myself or for my mom.
Then about 6 days to prom, daughter asked timidly - "Have you started on the dress?" - "No," I replied. "But, I thought you would be noble!" Noble? Me? Mwahaha , I said. I WAS noble for the last 17 years, but enough is enough. Then, after about 5 minutes,  I changed mind and got with the program. Since there were only a few days left, daughter relented and changed the design to this:
 
Admittedly, this looked much simpler, generic, basic and doable than the first sketch. There is no ribbon or wonky seams to contend with. Plus, I have sewn t-shirts before (but not blogged). I found McCall's 6288 raglan t-shirt pattern and started working on the prototype.
First, I sewed it as is from scraps, tried it on, made corrections and redrafted the pattern to open shoulders and decrease the width of the sleeve - for some reason - McCall's T-Shirt patterns have super wide sleeves.
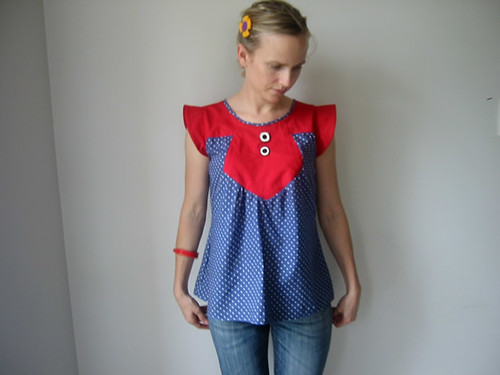
Then, I made a second draft t-shirt that looked more like the sketch and I added the clear elastic to it as well.
Daughter liked the second prototype so much that she wore it to school twice already even though it is not even hemmed, but teens can get away with a lot as far as fashion faux-pas.
Then, I got really tired from work, and did not do anything until the Monday of the week of the Prom. Daughter was getting increasingly nervous and kept asking me when will you start or did you start the dress yet to which I would say "hmmmmm-yeah-hmmmm" which could mean either Yes or No depending on what you want to or expect to hear. At the same time, my own mother has joined in scolding me for not delivering on the promise.Then, there was no turning back - I had to start - I have plunked $100 into fabric and daughter had no time to dress shop either in store or online. It had to be done. I started drafting the dress part, lengthened the skirt part of the top and cut lengthwise to create a skirt pattern piece - placed it on another piece of paper and traced the skirt front and back, trying to be designer-y. Later I have found there was no need to do that - all I had to do was swing out the side seams and lengthen it to the desired length and shape the hi-lo later on - since this is a knit. Now I know.

So I cut out the dress shell and the lining out of the power mesh and constructed each separately using my serger. Then, I sandwiched the sleeves - right side to right side and sewed it - then I sewed it into a conundrum - I could not figure out how to turn it out. So I had to undo one of them. Then, for the remaining sleeve shell and lining - I butted the sleeve openings together - right side to right side and sewed around it and that somehow worked. Then, I took the clear elastic and serged it all the way around the neckline along with the shell and the lining together. Then, I sewed the neckline on the sewing machine using the 3-step zigzag stitch turning down the elastic, I guess just like underwear sewing. Throughout all this, daughter would periodically run into my sewing room (Yessss, I do have a sewing room - thanks to my dad) and scold me. To that I would raise my finger and say the magic words - "Courage under Fire!" - she would run out, complain to her friends, get worked up and run back into the sewing room again to scold. To which, I would just chuckle and say the same thing again.
Then, I turned down the hem by hand - took me 2.5 evenings to finish it and here's the finished dress. Daughter was shocked that I was able to finish it and she tweeted to that effect. Then she said that she "be steppin' and finessing" and generally "be on fire" - thus I concluded that mission was accomplished to the satisfaction of the client. Now, what to do with the remaining sparkling fabric? I was thinking - maybe a wrap dress for myself? Maybe in another 10-15 years.
We forgot the boutonniere

I made that!!! (Both the dress and the daughter)

Bathroom selfie, of course

Daughter and her date with the matching tux

Non-stop selfies!!!

Monday, June 9, 2014

Three summer tops - 15 years in the making

I finally started sewing again. I actually have been upcycling and mending things, but not anything too exciting to share. I also made a dress for daughter to sing during an assembly way back in February, but it is not finished enough to be photographed - actually she's refusing to wear it again, so I am going to remake it for myself.
I had two 90s skirts from cotton voile made in India, the kind that used to be sold in hippie stands, that I had in my possession for about 15 years. They were given to me for free by friends. Too pretty to get rid of, too big and too short to wear so I kept them to make something of, moved it from apartment to apartment, house to house, and finally, a decade and a half later, made three tops out of it.
Simplicity 1615
Grainline's Tiny Pocket Tank
New Look 6892

Simplicity 1615 View A

The first one is a cute pattern Simplicity 1615 View A. It is super cute, but drafted super large. I measure size 16, usually fit 14. However, I cut out a 12. As you can see and as my mom pointed out, the armhole is way too big, but - even though the straps were sized down to size 6! and they are still too low. The straps and the armhole binding is a one piece. Therefore, it is really important to get the length right. I had to ease the armhole quite a bit, and what ended up happening is the ease amount was a little different so the back is crooked and one side scoops a lot more in than the other. No one would notice that besides people who sew, I hope, so I don't sweat it. It is still wearable, even though the material is slightly see through. Another fact about the pattern is that it is a little low cut and when sitting down, it kind of drops even lower and showing almost everything, please keep that in mind. I have to make a knit bandeau just like the one I made for daughter to wear underneath it.
The side seams are french seamed, the front top is finished with bias binding. The straps, armhole binding pieces - from self fabric. The hem was finished with roll hem foot. At first I was thinking to make views with sleeves but now I am too scared because of how low the armhole openings are. Other people who made up this view have pointed out and have warned on how big this pattern is, and that is the absolute truth. Still, it is an interesting pattern that might require some adjustments - for me it would be raising the armhole by about 2 inches.
Searching for a "good" face

Double strap is not a feature - just bra straps


Simplicity 1615 Misses Tops Line Drawing
Made view A with collar.
Simplicity 1615
Simplicity 1615

Tiny Pocket Tank

The next top I made from the same skirt is Grainline's Tiny Pocket Tank. At first, I didn't want to buy this pattern since I thought it was too basic. But after (yet undocumented) failure of Simplicity 1614 and after daughter's bike was stolen from school but later recovered, I officially broke down and bought $50 worth of Grainline's patterns including Scout, Maritime shorts, Moss skirt, and even Archer! I needed shopping therapy that day. However, knowing my record, I should be done with those within the next 65 years, so - stay tuned!. I am very pleased with how it turned out, the shoulders fit a lot nicer. It has a flattering flare design and the hem is shaped nicely. It is not just a regular old tank. Everything is very subtle - and it actually fits (in my opinion)! I did make a construction mistake and stretched out the back when applying the binding. That's because, I cut binding too narrow and I tried to make it work. It did, but the back is slightly wavy - again no one would notice it but me and you, now that I told you.
The reason the top is wrinkled is because daughter promptly incorporated the top into her wardrobe, she styled it with a small tie knot to turn it into a crop top. I was too lazy to iron and the "photographer's service hours" were closing.


This is a "Pleased with this tank" expression


Wrinkled due to daughter's previous wear
And this is all that's left from the skirt and some scraps.
Any item made out of this skirt is just that - Just Class!

New Look 6892

Next is New Look 6892. This is the first envelope pattern that I bought to add to my 100+ strong pattern collection along with a pattern for American Girl Doll clothes. The other pattern will not materialize any time soon, as daughter is now a high schooler.  

First there was the skirt, which was cut up by daughter during her dress up playtime 10-12 years ago. 


The colorway of the fabric is super bright 90s and features tribal stripes, night sky, moon, palm trees, pyramids, trees and even churches!
Then, there was a silk scarf found laying in the puddle of mud in the park while walking dogs a year or two ago.
I cut a size 12 because the finished measurements on the envelope were 42 inches which is the same measurement as my Gap medium woven shirt that fits very loose.
My original plan was to add a wide ruffle on the bottom cut from the striped section, but after I assembled the main pieces daughter immediately claimed the top and told me not to add ruffles so she could have a crop top to wear on the last day of school. Apparently, crop tops are all the rage in the junior and high school set. At first, I refused, not wanting to compromise my original design, but on careful consideration, I realized, the ruffle didn't go with the polka dot silk scarf's sleeves. I decided to listen to my daughter once again. However, I do want to implement my ruffle(d) vision in the nearest future.
The sleeves and side seams are done with french seams. The neckline is bound with bias binding and has elastic. I hemmed the blouse by hand - just didn't want to ruin the top at the last minute.

Here's some pictures of the finished top on me in the backyard:

Excuse  the pained expression - was trying to give instructions to the reluctant photographer


Didn't match the side seams - got too excited and impatient

There are two pyramids in the back, instead of one!

Here are some in progress pictures:


I really like polka dots, but the sun and the people around it - not so much.
I cut out the sleeves around both suns located on each end of the scarf. Now I have the sun scraps in case I ever want to applique them onto something, actually I just might!


And here's daughter wearing it to the skating rink:
At the end I would like to part with a gratuitous laundry shot along with my other makes, Burda 02/2010 #112A
 and a blouse based on the pattern of a dress from Журнал Мод 2001 or so.

Sunday, October 13, 2013

Loving Wendy

I have been in love with Wendy Mullin for many years, but not long enough, only since 2009. She's the original indie pattern maker before Colette and others. Her designs still look modern after so many years.
When I discovered her patterns, most of them were already starting to be out of print. They came out in 2006 and 2007. So, I don't have her entire collection of patterns. Some of them were too small, so I couldn't buy them. I have a Simplicity 4112 shirt pattern that is 1.5 sizes too small, I am hoping to wing it one day and see what happens.
I bought her books, however the Dresses and Coats books did not receive fair reviews on Amazon. It makes my blood boil when reading some of the comments. One commenter complained that the dress was falling off her shoulders. In Wendy's defense, the dresses should be muslined first, the design elements should be tried out on the mannequin before cutting into the good fabric. On the other hand, I don't deserve to love Wendy Mullin as much as I do because to this day I only made 5 items from 3 different patterns of which 3 were identical. I was procrastinating and didn't make any of her  patterns from the Dresses and Coats books, but I always read and reread them and they make me feel good.
Recently, I made T-Shirts for co-workers and a tube top for daughter based on patterns from Sew-U Home Stretch . Prior to that, I made a skirt from a plus size jumper from a thrift store during a 50% off sale based on the Sew U basic A-line skirt pattern.
I will post the pictures of the skirt later. It is black so it is hard to see the features.
But my favorite pattern of all times is Simplicity 3964
My favorite make of this pattern is on Flickr by WheresBeckyBean

So, this pattern has been on my mind now for almost half a decade. That's not so bad considering I have been wanting to learn French since I was 18, that's several decades now. I picked two items to upcycle - old skirt from Walmart and a dress from Old Navy - my daughter's old clothes.
 The question is how to place these scraps in the pattern (or on the pattern? ESL fail). Just today, while perusing BurdaStyle.com comment section (I should get a sewing life), I stumbled upon a good tutorial by the Curious Kiwi on how to Photoshop fabrics onto line drawings. I didn't want to learn GIMP, so I used my old trusty Paint.NET to create two mock ups of 3964 top.
Here are the two versions, I will sit on it (ESL alert) and decide which one to use.

I am leaning towards the version on the left, as it is more funky and shows off tie die print better! I imagine riding on my bike nonchalantly in a proto-hipster like fashion in the summertime or springtime instead of looking like a hobo on weekends. Must look cute before got too old as life's too short turns out. Let's see how many years it takes me to make this one.


Wednesday, July 3, 2013

Previous makes and refashions

Hi, 

I have been wanting to blog since forever and ever but never had anything to say.
Finally, I feel that it is necessary to be a full-fledged member of the sewing community, I need to have a face and describe my few projects. Up till now, I have been a lurker and an avid sewing blogs reader. Hopefully, there will be more to say.

So far I want to show what I made or remade.

These are leggins made for daughter from Burda magazine 6/2012 #124. Original pattern had a short length, so it is lengthened by 20 cm or about. The fabric is from Britex in SF - the store is so beautiful and staff is helpful, not snooty at all. It is very beautiful and feels wonderful next to skin.

However, she's not wearing them because there's no tops that match the crazy leggings. Another wardrobe gap.


And this one is a so called onesie for daughter. She loves it and wears it all the time when it is cold.
The pattern is Simplicity  1731. It was super fast to make by my standards. Some of my projects are 10 years old and still not finished. This one was done in 2 evenings. The only thing about this pattern is that the crotch hangs too low. I put the pattern against her and folded up the length removing about 3-4 inches or more. Now, I don't remember. The fabric was from Joann's and i got it at 50% off, but still came out expensive to about $24 dollars total. The

This one is a mullet skirt I made last fall (Fall of 2012). Again, daughter has nothing to wear it with. The fabric was bought from Joann's a very long time. I  don't know what I was thinking or envisioning. Only a young person can pull off this super busy print. For some reason daughter liked the fabric and was okay with me making this skirt
 

 The skirt was made from her old skirt which got unraveled due to wear and tear.


 The back view before attaching the waist band
 The side view of the skirt right after i fixed the hem


 The bottom skirt and lining for modesty and wearability - the black lining is from her old skirt.
Then, I have a couple of refashions of useless things into aprons:
1. Half apron plus shirt into an apron
 Below is a shirt that's kind of ugly and a half apron i had to buy for $5.00.

 Then I cut out the shirt
 and attached to the half apron
 Next, I have my practical gardening apron made out of overalls. I bought the overalls from a yard sale, but daughter did not like them because the denim was too stiff and they were not flattering.


To me, the apron turned out okay, I wear it all the time - I can harvest all my produce and stick it into the front pocket.

Then, I made underwear from an old t-shirt from Zoe's free pattern - Zoe is a great English blogger I have been following for years - I can assure you that they fit better than from the store and easy to make following her instructions. Thank you Zoe! I used a regular sewing machine : 


This is the Alice in Wonderland costume made for daughter 3 years ago?
Time flies. I used Simplicity pattern 2325
 Also made a petticoat to go underneath - the fabric I had since daughter was 4, I was going to make a Jasmine costume which again never materialized - this underskirt was so much work it almost took as long as the dress:

The heart is an applique embroidered on my previous bad sewing machine.
I didn't use a stabilizer, but used newspaper print underneath and it worked.
I also made another apron -that has Regretsy worthy potential.
It has a front hanging butt - can also be used for harvesting produce or chihuahuas.


That's it for now.